Chocolate Lava Cake Recipe: 6 Ingredients, 12 Minutes, Zero Regrets
Right.
Right. I’m going to be upfront with you: I resisted making chocolate lava cakes for years because they sounded like the kind of dessert that requires precision, temperament, and a culinary degree. The sort of thing where you mess up the timing by 90 seconds and suddenly you’ve got either a brownie or a warm cup of chocolate soup. Neither of which is actually bad, to be fair, but still. Not what you were going for.
Then Priya made them one night, effortlessly, while also having a full conversation with me. I watched her melt butter and chocolate together in a bowl, whisk in a few things, pour it into ramekins, and bang them in the oven. Twelve minutes later she put a little cake in front of me that, when I cut into it, produced a molten chocolate centre that was — and I mean this — genuinely one of the better things I’ve eaten in my life. I sat there for a moment. Then I said, “That’s it? That’s all it is?” She looked at me like I was an idiot. She wasn’t wrong.
This chocolate lava cake recipe is 6 ingredients. It takes about 10 minutes of actual effort. The oven does the dramatic bit. And the result is the kind of dessert that makes people think you’ve secretly been to pastry school, when in reality you just had a spare 12 minutes and some chocolate that needed using. Beans can’t eat chocolate, which he finds deeply unfair, but he sat next to me while I tested this four times and I reckon his emotional support counts for something.
The lazy version is below. Priya’s version involves tempering the chocolate and making a salted caramel sauce. Hers is 15% better. Mine takes 20% of the effort. You’re here, you know which one you’re getting.
Ingredients
- 125g dark chocolate (70% cocoa — the good stuff, it matters here)
- 125g unsalted butter, plus a bit extra for greasing
- 2 whole eggs plus 2 egg yolks
- 80g caster sugar
- 2 tablespoons plain flour
- Cocoa powder, for dusting the ramekins
- Ice cream or cream to serve — optional, but come on
Instructions
-
- Preheat your oven to 200°C (180°C fan). Put your 4 ramekins on a baking tray. Grease them with butter, then dust with cocoa powder and tip out the excess. This is the faffiest step in the whole recipe and it takes 2 minutes. You’ve got this.
-
- Melt the chocolate and butter together. You can do this in a heatproof bowl over a pan of simmering water, or just microwave it in 30-second bursts, stirring between each one. The microwave method is what I use. Takes about 90 seconds. Let it cool for a couple of minutes so it’s warm, not screaming hot.
-
- In a separate bowl, whisk together the eggs, egg yolks, and sugar until it goes slightly pale and a bit thicker. Takes about 2 minutes with a hand whisk. You can also just stir it aggressively and call it done — I cannot stress this enough: it doesn’t need to be perfect.
-
- Pour the chocolate mixture into the egg mixture and stir until combined. Then add the flour and fold it in gently until just mixed. Don’t overwork it. 10-12 folds. Step away from the bowl.
-
- Divide the batter evenly between the 4 ramekins. At this point you can cover them and stick them in the fridge for up to 24 hours — this is the lazy cook’s secret weapon. Make them ahead, bake when needed.
-
- Bake for 10-12 minutes. You want the edges set and the top to look just cooked but the centre should still have a slight wobble when you nudge the tray. 10 minutes = more molten. 12 minutes = a bit more set. I go 11 minutes because I like to live in the middle.
-
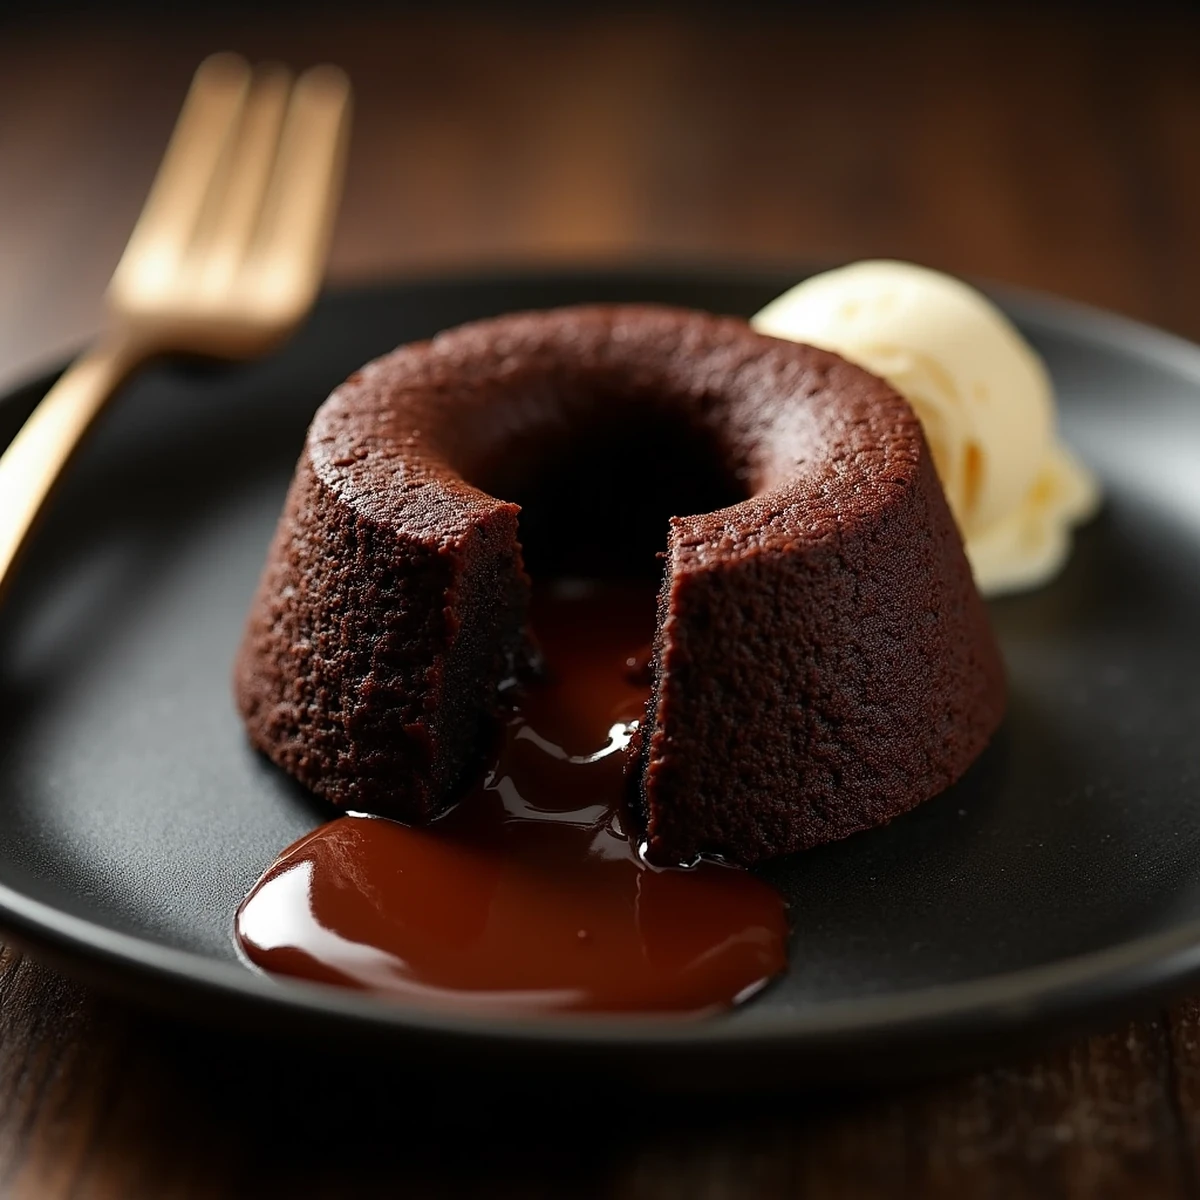
- Let them sit for 1 minute — just 1 minute — then run a knife around the edge, place a plate on top of the ramekin, and flip it over in one confident motion. Lift the ramekin off. There’s your lava cake. Cut into it immediately. Watch the middle do its thing. Eat it straight away — this is not a sit-and-wait dessert.
Nutrition
Tips
1. The flour is the only precision that matters. Too much flour and you’ve made a regular chocolate cake. Not enough and the whole thing collapses. 2 tablespoons. Level. That’s it. Everything else in this recipe is fairly forgiving — the flour is the one thing I’d actually measure properly.
2. Do the cold ramekin trick. Once greased and dusted, stick the ramekins in the fridge for 10 minutes before filling them. Cold ramekins help the outside of the cake set faster in the oven, which keeps the centre molten for longer. Priya taught me this. It works. The refrigerator does the effort so you don’t have to.
3. Make the batter ahead. Filled ramekins keep in the fridge for up to 24 hours, unbaked. This means you can prep these in the morning, have people over for dinner, and pull off a “freshly made” restaurant-quality dessert in 12 minutes while everyone thinks you’re incredibly impressive. You’re not — you prepped yesterday and then sat on the couch. But nobody needs to know that. Sorted.